If you don't know what Matariki is it's a cluster of stars that represent the new maori year. There are many legends about Matariki, Here is one of them!
Wednesday, 27 June 2018
The Story Of Matariki Slide Show
Last week I presented a google slideshow to my reading group about the story of Matariki.

Tuesday, 26 June 2018
Matariki Star
In class lately we have been learning about Matariki. Matariki is a cluster of stars and the stars are a symbol of the new Maori year. An art challenge we had in Moana 2 was to make one of the seven stars of Matariki. My group chose to make Matariki. This is our art work.

Tuesday, 19 June 2018
Smart Surfing Poster
 In school we have a program called Manaiakalani that teaches us things about staying safe on the internet and how to be cyber smart! Recently we have been learning about smart surfing. Smart surfing is finding exactly what you need in one search. In my class we had to make a poster giving some tips about smart surfing. Here are some of my tips.
My first tip is to use keywords while searching, in order to find more accurate results.
My second tip is to make sure to be specific to the topic to find better results.
My third tip is when using information off the internet make sure to check three other websites to make sure the information is correct.
Those are all my tips my tips!
Thursday, 24 May 2018
Story Bird Poem

Wednesday, 23 May 2018
Attributing Images
Lately in class we have been learning how to attribute images, which means to use only copyright free images and give credit to the original owner of of the picture. Here is my example!

Thursday, 5 April 2018
Kawa Of Care
Charlie, Mahia and I created a poster talking about The Kawa Of Care. The Kawa Of Care main idea is a poster talking about how to be cyber smart and cyber safe. It also tells you how to care for your chromebook or any type of laptop carefully. You won't get into any trouble online if you follow the steps on the kawa of care poster. It is important that you are responsible on the internet when your younger because when your older and looking for a job people could search you, and find something silly you did when you were younger. That is called a BAD digital footprint. A GOOD digital footprint example would be if somebody searched
 your name and saw a really good quality report on why we should keep the earth healthy. That is just one example of a GOOD digital footprint there are many other examples.
If You want to stay really safe you can follow these great steps on how to make a good comment.
1. Start with a greeting "Hi."
2. Compliment the author on their work "I Like.."
3. Does the blog post remind me of something similar? Make a connection.
4. Add more information.
5. Ask a question.
6. Re-read for sense - does my comment make sense?
7.Check for spelling and punctuation
8. Check with the teacher
9. PUBLISH

If You want to stay really safe you can follow these great steps on how to make a good comment.
1. Start with a greeting "Hi."
2. Compliment the author on their work "I Like.."
3. Does the blog post remind me of something similar? Make a connection.
4. Add more information.
5. Ask a question.
6. Re-read for sense - does my comment make sense?
7.Check for spelling and punctuation
8. Check with the teacher
9. PUBLISH
Wednesday, 14 March 2018
How I Plan My Week
Hi, this is how I plan my week. I plan my week through a digital timetable. It is pretty easy to fill in once you have filled it in a couple of times. Let's start.
Step one: First you get sent an email from your teacher, I usually get an email from Matua Fergus. The email is telling you what options you have to select for your groups, writing, maths, reading, te reo, and physical education. the email is an link that leads you to a google form.
Step two: This step is pretty basic! Once you have clicked on the link that leads you to the google form, you select which group suits you the best. everyone has to select at least one group for each activity. Once you have finished that, you check it so you are happy with your answers. Then you submit your form.
Step Three: Next you go onto the Moana Learning Hub. The Moana Learning Hub is our class website. We get updates and all of the information that is needed for our learning. If you go onto Moana Learning Hub website, and scroll down on the homepage you will find a clock image. That image is a link to our class timetable. When you click on the image, it will lead you to the class time table.
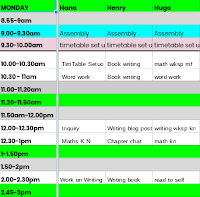 Step Four: Once you are on the shared timetable you find your name. Then there will be a line of boxes under your name. Next to your name you will have all the times of the day. Some will be blocked because your teachers want you to do a certain thing. Blocked means you can not change that box. Once you have found your name you can start writing what your week is going to be like! For example, if I had a maths workshop at 11:30, then I would write in the 11:30 box, "Maths workshop." It is very important that you also put what teacher you will have for that workshop. Just using the initials of your teachers name is a good way to save space.
Step Five: So once you have filled in all of your timetable with workshops, you will notice that there will be gaps in your timetable. So, to fill the gaps, go back to the Moana Learning Hub, and just under the clock image there will be a purple slide named, "Links To Learning Activities." On that slide there will be a lot of learning options that you can choose from. For example there is the basic facts challenge or the read to self. There are many different options that you can choose from to fill in your timetable. You have to do all of these activities at least once in that week.
Step Six: Now you have sorted out what activities you want to do, you fill in the gaps with these other non-workshop activities. Remember to always pick the activities that you need to do first, not the ones you want to do.
Step Seven: Now you have done your timetable for this week. Remember to keep on task. Every task is thirty minutes so keep on task and be prepared for next week's timetable!
Written By: Hana
Step one: First you get sent an email from your teacher, I usually get an email from Matua Fergus. The email is telling you what options you have to select for your groups, writing, maths, reading, te reo, and physical education. the email is an link that leads you to a google form.
Step two: This step is pretty basic! Once you have clicked on the link that leads you to the google form, you select which group suits you the best. everyone has to select at least one group for each activity. Once you have finished that, you check it so you are happy with your answers. Then you submit your form.
 |
 Step Four: Once you are on the shared timetable you find your name. Then there will be a line of boxes under your name. Next to your name you will have all the times of the day. Some will be blocked because your teachers want you to do a certain thing. Blocked means you can not change that box. Once you have found your name you can start writing what your week is going to be like! For example, if I had a maths workshop at 11:30, then I would write in the 11:30 box, "Maths workshop." It is very important that you also put what teacher you will have for that workshop. Just using the initials of your teachers name is a good way to save space.
Step Five: So once you have filled in all of your timetable with workshops, you will notice that there will be gaps in your timetable. So, to fill the gaps, go back to the Moana Learning Hub, and just under the clock image there will be a purple slide named, "Links To Learning Activities." On that slide there will be a lot of learning options that you can choose from. For example there is the basic facts challenge or the read to self. There are many different options that you can choose from to fill in your timetable. You have to do all of these activities at least once in that week.
Step Six: Now you have sorted out what activities you want to do, you fill in the gaps with these other non-workshop activities. Remember to always pick the activities that you need to do first, not the ones you want to do.
Step Seven: Now you have done your timetable for this week. Remember to keep on task. Every task is thirty minutes so keep on task and be prepared for next week's timetable!
Written By: Hana
Subscribe to:
Posts (Atom)